Counting Sperm With a Hemocytometer
Counting sperm to determine concentration is an essential part of evaluating or processing semen, and counting sperm with a hemocytometer is a very accurate method when performed correctly.
In order to do anything with a reasonable expectation of success when preparing semen for use, one needs to know the raw sperm concentration. There are a variety of tools available to do this ranging from the highly accurate but very expensive Nucleocounter – around US$13,000 – through the much cheaper photometric counting devices (US$1,000 to 1,500 or so), to the cheaper and accurate but far more tedious Hemocytometer, which can be found for around US$100 (but does also require a suitable microscope). When the intention is counting sperm with a hemocytometer, one should make sure one obtains a “Bright Line” version, as this more clearly delineates the counting squares.
The Equipment:
What is a hemocytometer?
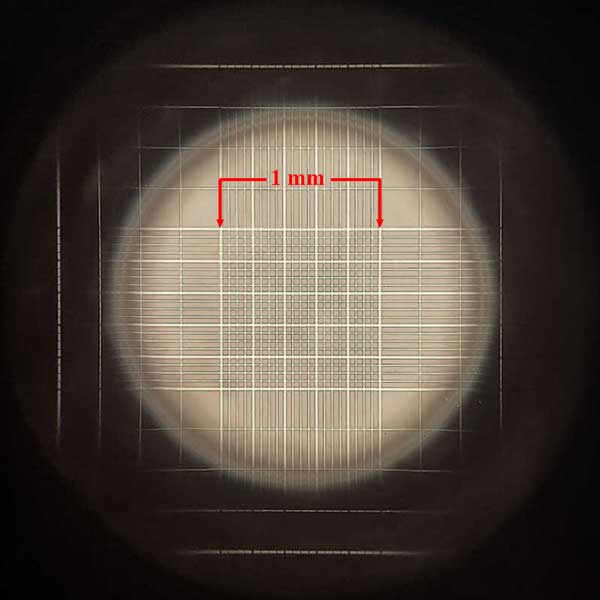
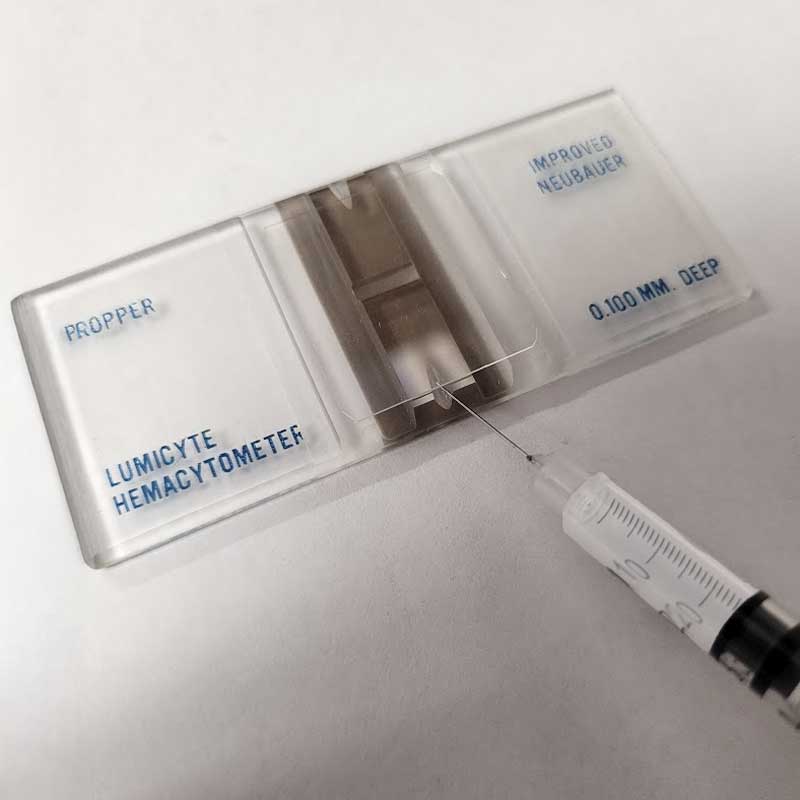
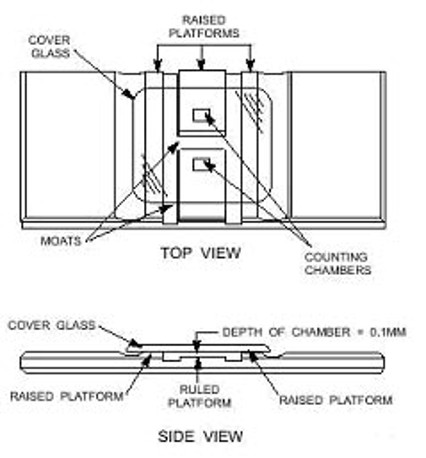 The hemocytometer is a specialized microscope slide which has two highly polished, raised surfaces, each of which has an accurately etched grid. The etched surface of each of these grids carries a series of squares, the largest combination of which is exactly 1 mm square. To each side of the raised surfaces with the grids are additional raised shoulders, the top of which are exactly one-tenth of a millimeter above the surface of the etched grid section. Upon these shoulders is placed a cover slip (aka “cover glass”). Because of the exact depth and the accurately etched grid surface, the volume of the area within the outer square under the cover slip will be exactly one-tenth of a cubic millimeter. This volume of one-tenth of a cubic millimeter equates to 1/10,000 of a cubic milliliter, the milliliter being the volume in which we typically report equine sperm concentrations (i.e. so many hundred million sperm per mL). To determine this usable concentration reading when counting sperm using a hemocytometer some fancy math may be required – but fear not and read on! We make this easier with a simple technique below.
What sort of microscope is required?
An older good quality Nikon microscope suitable for counting sperm with a hemocytometer
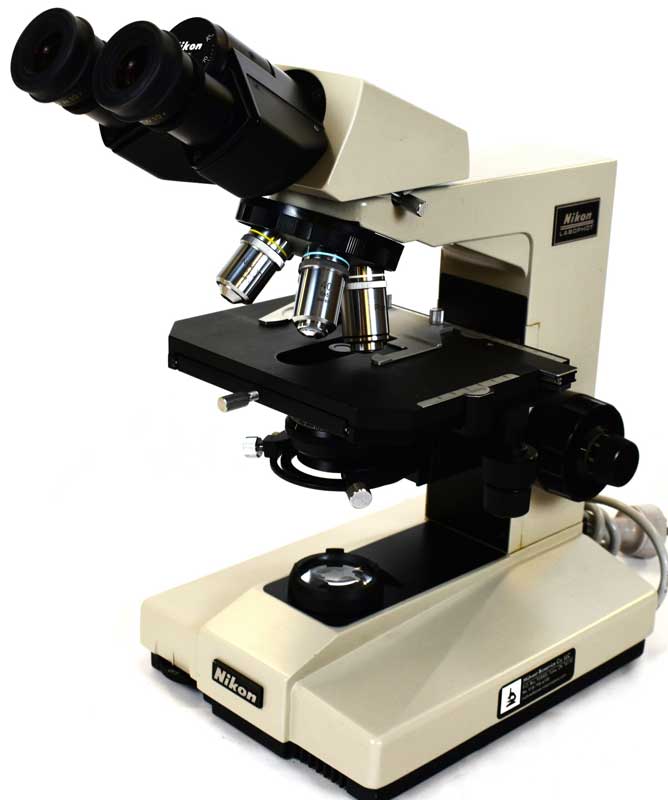
When counting sperm with a hemocytometer it will be necessary to have a microscope with magnification in the regions of 100x to 400x (there are variables available – for example a 200x will also be adequate in many cases). The microscope should be of reasonable quality to ensure good clarity of image and depth of field. If finances are limited when starting out, we recommend purchasing a used good quality “brand name” microscope rather than a cheaper new microscope as the optics in the brand name ‘scopes will be better. “Brand names” include (but are not limited to) Bausch and Lomb, Leica, Nikon, Olympus and Zeiss, etc. These can often be found at a reasonable cost on eBay although the usual caveats apply when buying from such a source. The type of microscope – bright field will be the most common, but a dark field phase contrast can also be used – is somewhat immaterial, however it is critically important to make sure that there will be adequate clearance between the objective lens and the microscope stage to allow placement of the hemocytometer and still be able to focus. The hemocytometer is considerably thicker than a regular microscope slide, so not all microscopes will accommodate the hemocytometer and be able to focus. Typically, the models from the “brand names” mentioned will work, while some of the cheaper makes may not, so again, it is a “caveat emptor” situation. This is more of a concern with the phase contrast microscope than a bright field unit. The microscope should have a mechanical stage to allow fine adjustment of movement of the hemocytometer. While it is possible to count sperm with a hemocytometer without a mechanical stage, it is infinitely harder, as the slightest movement of the slide by hand can result in a dramatic change of view at a magnification of 100x or 400x!
The Method for Counting Sperm with a Hemocytometer:
Setting up for an Easy Outcome – Dilution Rates
When counting sperm with a hemocytometer to determine concentration, the easiest way – which avoids subsequently complicated math – is to take 1 ml of the raw semen and dilute it in 9 ml of warmed semen extender – the advantage of using extender is that one can subsequently take a sample out of this to evaluate motility too. Then take 1 ml of this extended sample and extend that with 9 ml of distilled water (regular water will work, but may contain impurities). Using water will kill the sperm. If ejaculate volume is limited, then using one-tenth of these volumes can reduce the amount of raw semen required. The key here is using a 1:9 and then again 1:9 dilution. This equates to a 1:99 dilution ratio, or a 100 dilution. The methods of dilution will depend upon equipment and semen volume availability. In a fully equipped lab, pipettors or measuring devices may be used, alternatively if they are not available – especially with the lower volume method – syringes may be used.
Before Loading…
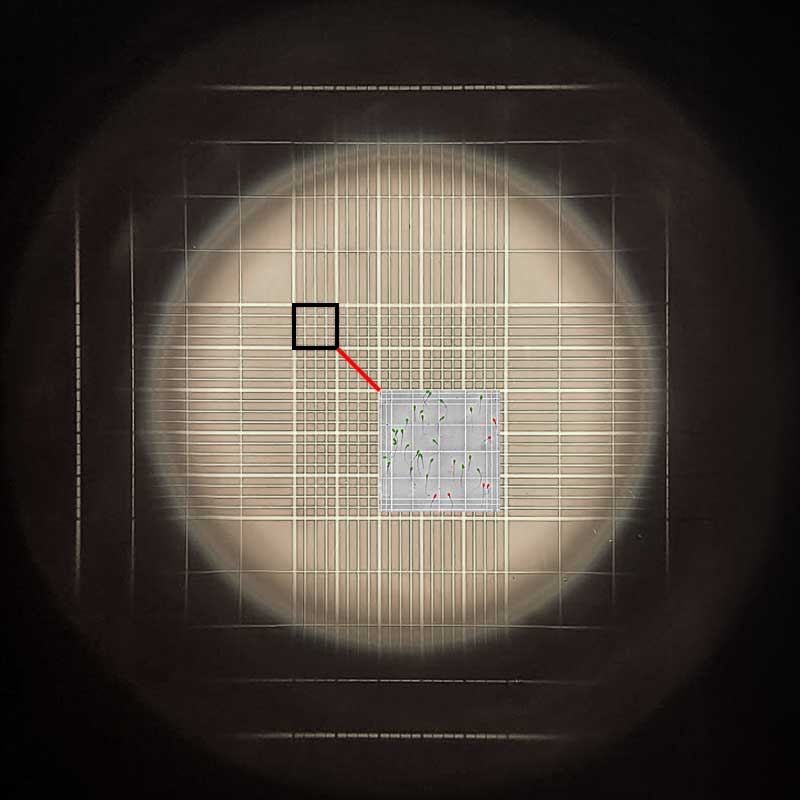
The gridded area consists of an etched area covering 1 mm square. All of the 25 larger squares are the squares which are counted,
Place the hemocytometer on the microscope and locate and focus the counting grid. Be very careful not to move the objective too far down! This is a classic mistake and once the cover slip is in place will result in breaking the cover slip! If it is difficult to obtain focus, initially don’t worry too much about focusing on the grid specifically, but simply locate a portion of the hemocytometer with some contrast – perhaps where there is some wording. If the microscope is a reasonably good quality one, it should also be possible to start at a very low magnification – perhaps 40x – which will offer a larger field of view. Then once focused and positioned correctly with the grid central at that magnification, change the objective to the next higher magnification. Good microscopes should maintain focus and central position. If it is initially difficult to find the grid under the microscope even using that method, a combination of tactics can be employed. Squatting slightly so that one’s eye is in alignment with the stage will allow one to line up the grid with the objective lens on the “Y” axis. Using the mechanical stage’s “X” axis adjustment, one can then move the hemocytometer forwards and backwards (closer to and further away from one) until the grid is in position and visible. Once positioned and focused, remove the hemocytometer carefully without moving either the mechanical stage position or the focus knob of the microscope. Take note of the hemocytometer’s orientation and once loaded with the sample and being replaced on the microscope, ensure the same orientation is used. Pre-locating in this manner will save a lot of subsequent hunting, although fine-tuning will still likely be required.
Loading the Hemocytometer
Loading the hemocytometer with a syringe – note the small notch where the semen is introduced
Once the semen is extended as above, ensuring it is gently mixed at each step, a small volume should be drawn up into a pipettor or a syringe from the second dilution for loading the hemocytometer. Lightly dampen the raised areas each side of the counting grid and place the cover slip onto the unloaded hemocytometer. Dampening the shoulders in this manner reduces the chance of the coverslip moving. Ideally one should use the heavier cover slip specific to hemocytometers, as that prevents the cover slip floating. The semen sample is then gently introduced into the small notch on each side of the hemocytometer, with the fluid advancing to cover both gridded portions using capillary action. Make sure to neither overload nor underload, nor to disturb the cover slip. One wants just a little bit of the liquid visible over the edges of the counting area, but the gutters should definitely not be full.
Once the hemocytometer is loaded, it should be allowed to settle for a few minutes. This can be done in a high-humidity chamber to avoid evaporation if extreme accuracy is required, or simply by placing it on the microscope stage with the light source turned off. The advantage of allowing the sample to settle is that the sperm will drop to the bottom of the liquid, avoiding the need to repeatedly move the focal plane up and down through the sample.
Counting Sperm With a Hemocytometer
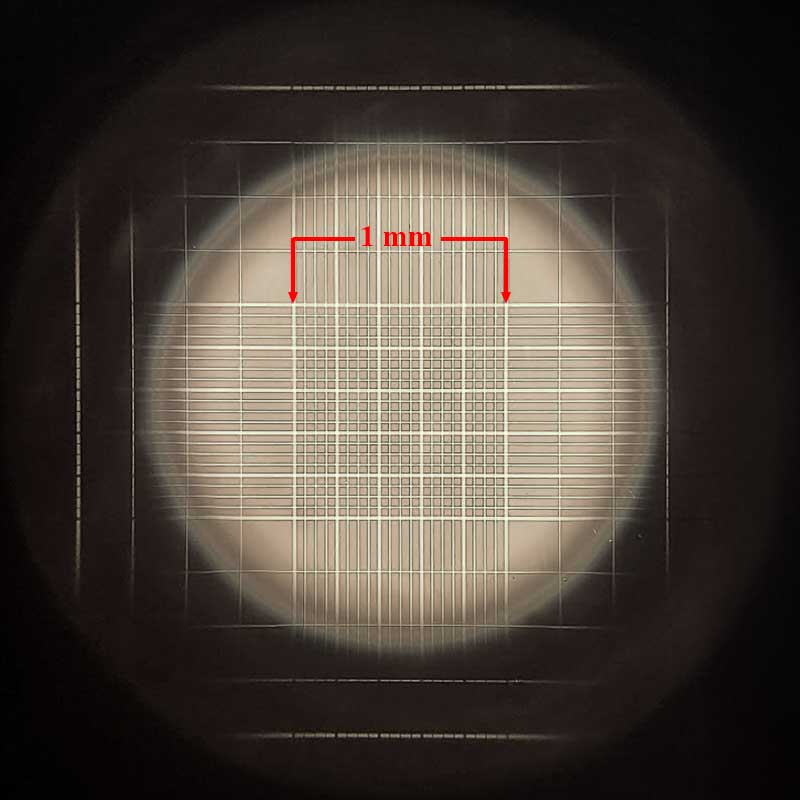
This is one of the 25 squares which are counted as described in the text
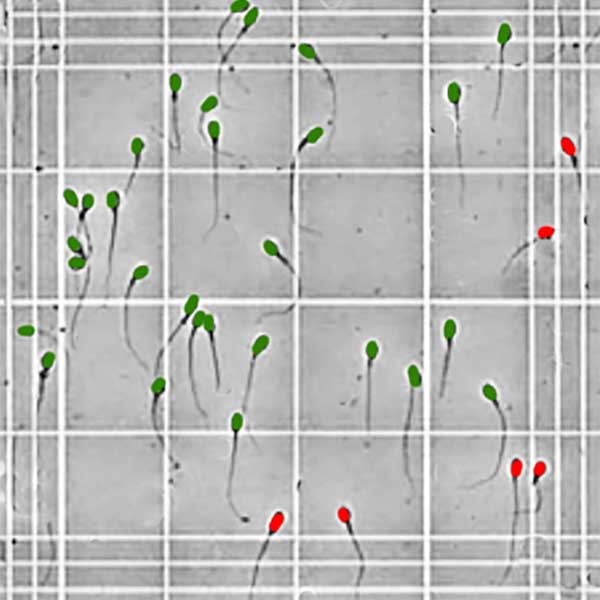
Sperm crossing or contacting the lines in a single square to the left and top are included in the count (green), while those to the right and bottom are not (red)
Using the microscope – typically at 100x but some use up to 400x – count the sperm that are visible in a total of 25 of the central squares – those which are seen in the attached image in the center of the grid. The grids on both sides of the hemocytometer should be counted – and each side has 25 squares which may be counted, so either count 12 on one side and 13 on the other, or count all 50 (25 on each side) and divide the total number of sperm counted by 2. The more squares that are counted, the greater the overall accuracy. Sperm which come into contact with or cross the line to the top and left of the square being counted should be included in the total (green), while those which are in contact with or crossing the line to the right or bottom should not be included (red). If the adjacent square is being counted, these will be included in that count, as they will then be on the top or left line. This prevents sperm being counted twice (it doesn’t really matter which are included – those crossing or touching to the right and bottom or those to the left and top – just be consistent throughout your entire evaluation!)
The Calculations for Counting Sperm With a Hemocytometer
There are none!
At least if you followed the above directions!
Diluting the semen and counting in the manner described makes the concentration calculation easy. The number of sperm one counts in 25 squares represents the concentration in millions per ml – i.e. if one counts 150 sperm, the concentration is 150 million sperm/ml.
One can now take that number and put it into our semen calculator, along with the volume and the percentage progressive motility and perform the required dilutions for shipping or on-farm use.
Conclusion to Counting Sperm with a Hemocytometer
How Long Does It Take?
When first starting, counting sperm with a hemocytometer will typically take up to about 15 minutes. Once one gets proficient, one should be able to do it in under 10 minutes. Owing to the amount of time it takes, it does mean that the rest of the raw semen should be extended 1:1 with a suitable warmed (to body temperature) extender to reduce sperm damage while one is counting, and prior to performing one’s final extensions. If the lab is above 70°F (21°C) then it’s not necessary to worry about putting the extended semen back into the incubator – and in fact it is better to allow it to cool to room temperature, particularly if the semen is to be shipped. If the room is cold however, the incubator should be used, although this is less ideal than having an adequately warmed lab.
Cleaning the Hemocytometer and Cover Slip
Immediately after counting sperm, both the hemocytometer and the cover slip should be rinsed with warm water to remove all of the sample and then dried with a soft lint-free rag or piece of paper towel. Some like to do a further rinse with ethanol (alcohol), and certainly if there are a lot of impurities in your tap water, this would be advisable to prevent staining or mineral build-up.
Summary
Counting sperm with a hemocytometer is an accurate and comparatively cheap way to determine sperm concentration. It does, however, take time, and does require attention to detail. While there are other methods, we have found the one described to be the easiest. Remember to dilute 1:9 and 1:9 again to obtain 100 dilution, and then count a total of 25 squares, or 50 and divide by 2. If this dilution and counting method is not used, then errors for the calculations become more likely. Although counting sperm with a hemocytometer is an accurate method when performed correctly, failure to pay attention to detail will result in a potential for errors to be made, which will of course reduce accuracy.
© 2025 Equine-Reproduction.com, LLC
Use of article permitted only upon receipt of required permission and with necessary accreditation.
Please contact us for further details of article use requirements.
Other conditions may apply.